Quick & Simple Colour Correction
The question:
Is there an easy way to remove colour casts from an image?
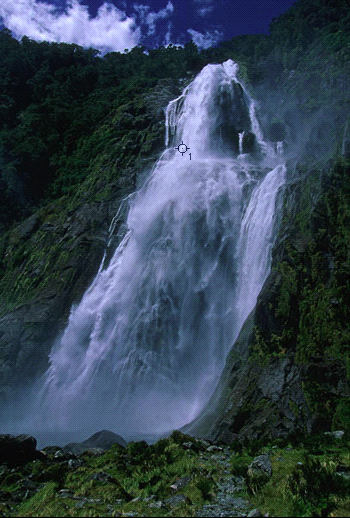
Look at this shot of a waterfall. It's gorgeous isn't it?

Why yes it is! But a blue colour cast is very apparent in it. If it's not that noticeable to you now, I'm sure that you'll see it by the end of this article.
In this article I'll show you how to quickly remove those and bring back the shot to what it should've been in reality. I will only be discussing the colour cast here and not the contrast, darkness, etc. of the image.
This technique relies on identifying what should be a white spot in the image. Looking at the image we know that the lightest spots of the waterfall SHOULD be pure white (now they're a bit blueish) and in theory if we bring one of those spots back to pure white we've successfully removed the colour cast from the entire image.
How to identify the brightest spots in the water fall (or image):
1. Bring up your levels palette. You'll find it under the Image menu, or just hit ctrl L (command L in a mac).
2. Drag the left slider to the right until it's very close to the right edge. Notice the image getting darker and darker as you progress?


Here is what your image should look like, remember DO NOT press ok just yet.
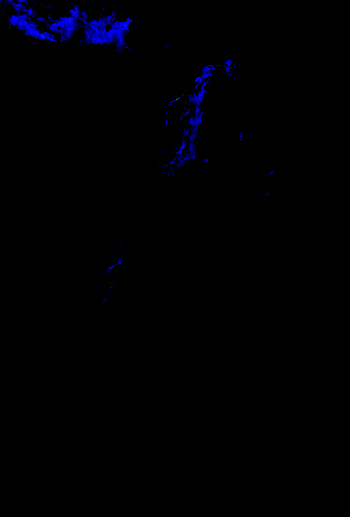
What you're looking at here are the brightest spots in the image. Concentrate on the waterfalls and try to identify the brightest in those.
I see a couple of spots that could work for us here and here.

3. Hold the shift key and click on what you think is the brightest spot on the waterfalls. This shall leave a mark there for you so that you won't have to remember exactly where that spot was.

4. Bring back the slider to the extreme left like it was before. Your image should return to the way it looked when you first opened it. It should also have the marker you've created in the previous step.
5. Click on the white eyedropper. The one to the far right of the three eyedroppers.

6. Click on the spot that you've marked and hit ok.
7. That's it!
congrats, you've just colour corrected the image.
Here is what it looks like now.

Click here on the image below to see the original image and the corrected one side by side.
 That concludes Quick & Simple Colour Correction.
Lee
posted by liban at 6:23 PM
![]()


0 Comments:
Post a Comment
<< Home